Two-Rail Shear Test Fixture (ASTM D4255)
Model No. WTF-2R (Stainless Steel)

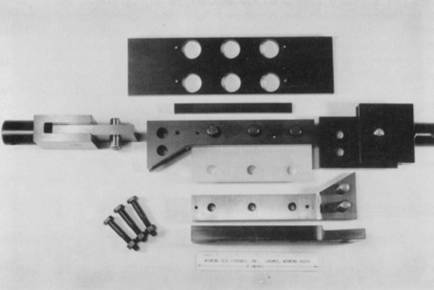
Fig. 1: Partially Assembled Fixture, with Specimen in Place but Specimen Installation Jig Shown Separately at Top
The Two-Rail Shear Test Method and associated fixture is described as Method A in ASTM Standard D4255 (Reference 1). It became an ASTM standard in 1983. The specimen is 6 in. long and 3 in. wide, and of any reasonable thickness. The ASTM standard recommends a thickness between 0.05 in. and 0.13 in. If the specimen is too thin it will buckle. If the specimen is too thick it will slip in the grips. Three bolts in each rail pass through the specimen, requiring six clearance holes in the specimen.
Six large holes in the installation jig (shown at the top of the photograph in Fig. 1) provide clearance for the fasteners that clamp each pair of side rails to the specimen.
The specimen gripping surfaces of the side rails are coated with tungsten carbide particles. A spacer bar (shown just below the installation jig in Fig. 1) is provided to maintain the proper ½ in. spacing between the rail halves during final assembly. This spacer is then removed before testing.
The fixture end fittings are standard 1.25 in. diameter smooth male studs with a 0.50 in. diameter retaining pin cross-hole in each (Instron Type Dm connections), to connect directly to the crosshead and base of the testing machine, or to optional adapters. The assembled fixture is then loaded in tension.
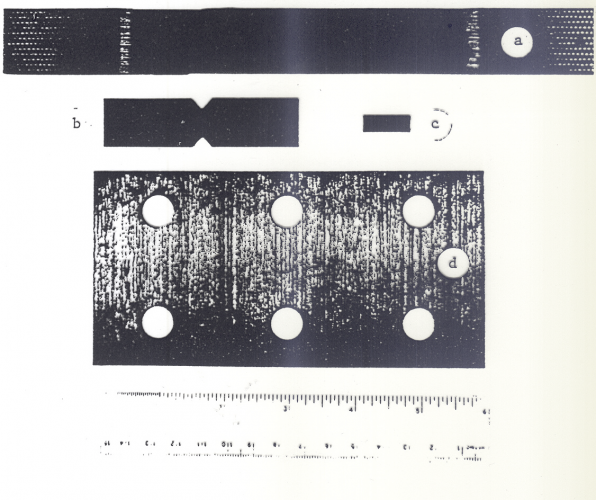
This test method, although still an ASTM standard, has never been very popular. The specimen is relatively large, as indicated in the photo of Fig. 2 showing actual Iosipescu, short beam shear, and two-rail shear specimens. More material is consumed per specimen and there is additional cost associated with the necessity of drilling six holes in specimen for attachment of the side rails.

Fig. 2: Specimen Size Comparisons for Four Shear Test Methods:
a) ±45º Tensile Shear (ASTM D3518)
b) Iosipescu Shear (ASTM D5379)
c) Short Beam Shear (ASTM D2344)
d) Two-Rail Shear (ASTM D4255)
To alleviate these deficiencies, ASTM D7078, the V-Notched Rail Shear test method, has been developed as an alternative. However, the two-rail shear test fixture is still available from Wyoming Test Fixtures, Inc. should it be required for some specific application.
Sources of Additional Information:
1) ASTM Standard D 4255-01 (reapproved 2007), "Guide for Testing In-Plane Shear Properties of Composite Laminates," American Society for Testing and Materials, West Conshohocken, Pennsylvania (first published in 1983).
2) D.F. Adams and E.Q. Lewis, "Current Status of Composite Material Shear Test Methods," SAMPE Journal, Vol. 31, No. 1, January/ February 1995, pp. 32-41.
3) A.K. Hussain and D.F. Adams, "The Wyoming-Modified Two-Rail Shear Test Fixture for Composite Materials, Journal of Composites Technology and Research, Vol. 21, No. 4, October 1999, pp. 215-223.
4) D.F. Adams and E.Q. Lewis, "Experimental Assessment of Four Composite Material Shear Test Methods," Journal of Testing and Evaluation, Vol. 25, No. 2, March 1997, pp. 182-189.

